Friday, December 23, 2016


10 Brilliant Command Prompt (CMD) Tricks You Probably Don’t Know About


While talking about the 15 amazing Run Box commands the other day, I mentioned how both Run Box and Command Prompt are treated as a bit nerdy. Well, one might work on Windows without even touching the Run box but you cannot run away from Command Prompt (cmd). No matter how good Windows may evolve on the GUI front, Command Prompt (or more accurately, the Command Line ) was how it all began.
So here are some great tips you can use to make yourself comfortable while working with the Command Prompt. First things first, the shortcut for Command Prompt is cmd and that’s all you need to type in the Run box or the Start search in order to bring it up. Now on to the cool tricks, which might be known ones for the geeky ones among you, but on the other hand, have the potential to incite the a-ha moment for many other everyday computer users among you.
Let’s roll, shall we?

1. Open Command Prompt in a Folder

When you open the command prompt, it opens up in either User or System folder depending upon whether you ran it as administrator or not. Now the thing is, if you want to execute a file in any particular folder, you would have to use the change directory(cd) command to navigate to the folder which can be a problem if the directory is nested way too deep.


OPEN COMMAND PROMPT HERE
To ease things you can open the folder in your Windows Explorer, hold Shift key when you right-click in the folder and select Run command window here  to directly open the CMD prompt with the path to that folder directly.

2. Enable QuickEdit for Easy Copy/Paste

One thing I miss the most in Command Prompt is the ability to easily copy and paste text using the conventional Windows hotkeys. Normally, one would have to use the right-click context menu options to copy and paste text, but if you enable QuickEdit, you can do them using simple shortcuts.
quickedit
To enable the QuickEdit mode, right-click on the Command Prompt Title Bar and select Properties. In the Properties Window under the Option Tab enable QuickEdit Mode. That’s all; you can now quickly select text by dragging your mouse pointer. Pressing the enter key on the selected text will copy the text to the clipboard, and a simple left click would be enough to paste the text.

3. Run Command Prompt as Admin

Many commands require you to run command prompt as administrator. When you search for CMD in Start Menu, other than selecting Run as administrator from the right-click menu, you can simply press Ctrl+Shift+Enter to open it with admin privileges. This trick will work for all the programs installed on your system.

4. See Command History

You can see last used commands in a session using the navigation buttons, but if you would like to see a list of all the commands, you can get it by pressing the F7 button.
f7
Alternatively, you can use the command doskey /history  to list these commands in the command prompt itself.
doskey history

5. Change Command Prompt Looks

white CMD
Are you bored with the conventional black-and-white looks of the command prompt and would like to paint it different? We have already covered a guide on how you can customize your command prompt which you can refer to make the changes.

6. Copy Commands Output to Clipboard Directly

Sometimes one might want to copy the output from a command to clipboard, like at times when you get an error, and you want to paste the exact error in email or while chatting with someone.
To store a command output to a clipboard add the command | clip at the end of the command. For e.g. Dir /p | clip

7. Drag and Drop Files to Change Path

If you are already in command prompt, and you want to copy the exact path to a folder or file to run the file or change the present working directory, you can simply drag and drop the file or the folder on the command prompt.
The path of the dropped file or folder will show up in quotes.

8. Run Commands Simultaneously

You can put && between two commands and execute them one after another. The command on the left will execute first followed by the command on the right of the double ampersand.

9. Get Help for Command

help
Well let’s say you know about a command, but you are not sure how it works. Not a problem, all you need to do is suffix the command with /?  and execute it. If the command is valid, the command prompt will give you all the information related to it.

10. Watch Star Wars in ASCII

star wars
For all my nerdy friends who are diehard fans of Star Wars, you can actually watch the Star Wars Episode IV movie in the command prompt. Though it would be in ASCII, it will be fun. To start the movie, open command prompt, type in telnet towel.blinkenlights.nl. and press enter. Don’t forget the popcorns though 🙂

Monday, December 19, 2016

How to Format USB Flash Drive in DOS


 A USB flash drive cannot be used to store information until it has been formatted. You have a few methods to choose from when it comes to formatting. You can use FAT, FAT32 or NTFS formatting types by formatting the drive in Windows Explorer. Alternatively, you can format the drive using DOS if you like to work with the command prompt or if you have difficulty formatting the drive using the graphical interface. 

Now use the following step to format usb completely..


Step 1

Plug your flash drive into an empty USB port on your computer.

Step 2

Click "Start," "All Programs," "Accessories" and "Command Prompt" to open the DOS command prompt window.

Step 3

Type "diskpart" after the command prompt to start the Disk Partition utility. This should result in a DISKPART command prompt.

Step 4

Type each of the following commands, one at a time, after the DISKPART prompt, pressing "Enter" after each:list diskselect disk #cleancreate partition primaryselect partition1active format FS=NTFSassignexit

Step 5

Close the command prompt window. Your USB drive is now formatte


Wednesday, December 14, 2016

Keeble keyboard for iPad: flexible text input for users with special needs


Keeble is a virtual keyboard for iPad made by AssistiveWare. The app is only available in English for iPads running IOS 8 and above. As a result of new features available in iOS 8 the Keeble keyboard can be used in almost every app on the iPad including mail, Safari, and messages. Keeble gives users a number of customization options to make text input easier for users with special needs such as motor challenges,  dyslexia, and other disabilities.

One option available is the ability to change the appearance of the keyboard. Users can change the color of the keyboard which could be helpful for users with visual impairments. The higher contrast colors can be more easily seen compared to the white and gray colors of the default iOS keyboard. The layout can be change from a QWERTY layout to an ABC layout if desired.


Keeble also includes word predication to speed up typing; especially for switch control users. The word predication features is slightly more advanced than IOS 8 build in protection. Keeble allows users to change the number of predictions offered above the three offered by the default iOS 8 keyboard.

Keeble also allows users to change how the keys respond to taps and presses. This is especially useful for users with motor challenges that may cause accidental taps or presses on unwanted keys. Hold duration can be set to change how long a key must be held before that character is entered. With this option enabled, quick accidental taps will not be registered. Additionally, the backspace repeat can be customized to avoid accidentally deleting text. A "select on release" option is also available which will enter text on release of a key instead when the key is pressed.

The last customization option allows users to turn on spoken feedback of the text they type. Feedback can be given letter by letter, word by word, and/or sentence by sentence. This feature allows people with dyslexia or poor spellers to confirm that what they words they think entered are the words that they hear being spoken back to them using text to speech. While this feature is useful it can only be enabled and disabled via the apps settings. If there was an option to turn on and off auditory feedback directly, it would be much easier to access the feature when needed and disable the feature when not needed. Users can totally turn off the iPad's speakers but this will also mute all other audio output. There is space on the bottom right of the number and symbol entry keyboard where quick access to this setting could be added.

Friday, December 9, 2016

The Top 10 Wifi Hacking Tools in Kali Linux

A lot of the router manufacturers and ISPs are still turning on WPS by default on their routers which makes the wireless security and penetration testing an even more important. Using the below Top 10 Wifi Hacking Tools you will be able to test your own wireless networks to find potential security issues.

1 Aircrack-ng

Aircrack is one of the very popular tools for WPA/WPA2/WEP cracking. The Aircrack-ng suite contains tools that help to capture packets and handshakes, de-authenticate connected clients and generate traffic and also tools to perform brute force and dictionary attacks. Aicrack-ng is an all-in-one suite that contains the following tools and many others:
– Aireplay-ng to generate traffic and client de-authentication
– Aircrack-ng for wireless password cracking
– Airbase-ng to configure fake access points
– Airodump-ng for packet capturing
If you wish to use this tool, make sure your Wifi card is capable of packet injection.

2 Reaver

Reaver is definitely second one in the top 10 Wifi hacking tools. Reaver is a very popular tool for hacking wireless networks. Reaver targets specifically the WPS vulnerabilities. The Reaver performs brute force attacks on WPS (Wifi Protected Setup) registrar PINs to recover the WPA2/WPS passphrase. Since there are many router manufacturers who turn on the ISPs by default, a lot of routers are vulnerable to this  attack out of the box.

3 Pixiewps

PixieWPS is a new tool included in Kali Linux. Pixiewps also targets a WPS vulnerability. PixieWPS is written in C and it is used to brute force WPS PINs offline and exploits the low or non-existing entropy of vulnerable access points. This is also called a pixie dust attack. PixieWPS needs a modified version of Wifite or Reaver to work with. Considering the recent growth of this tool, itstood 3rd in our list.

4 Wifite

Wifite is an automated tool and expects a very little work form the user. When start-up it asks a few parameters to work with and then it will  do all the hard work. Wifite attacks multiple wireless networks that use encryptions like with WEP/WPA/WPA2 and WPS. It captures the WPA handshakes, spoof your MAC address and safe the cracked passwords, automatically de-authenticate connected clients.

5 Wireshark

Wireshark is one of the top network security analyzing tools available online. Using Wireshark you can analyse a network to with a great detail and see what’s happening inside.

6 oclHashcat

oclHashcat is not a dedicated Wifi hacking tool and it also does  not come with  Kali Linux. But it can do brute force attacks and dictionary attacks on captured handshakes at a very high speeds  using the raw power of GPU. Comparing to other tools like Aircrack-ng suite, oclHashcat  is fast since it is using  a GPU instead of a CPU. An average GPU can do upto  50,000 combinations per second with oclHashcat.

7 Fern Wifi Cracker

Fern Wifi Cracker is a wireless security auditing and attack tool and it is written in Python. It is the first tool in this list to have a graphical user interface.

8 Wash

Wash is a tool to determine whether an access point has WPS enabled or not.

9 Crunch

Crunch is a great and easy to use tool for generating custom wordlists which can be used for dictionary attacks.

10 Macchanger

Last but not least in this top 10 Wifi Hacking Tools is Macchanger. Macchanger is a little utility which can be used to spoof your MAC address to a random MAC address or you can make up your own.
What is your favorite tool?
Would you agree with our list?
Share your thoughts and suggestions in the comments section below.

Getting Started With Kali Linux


Getting Started With Kali Linux


This post is for so many of the people in the community asking for and having problems installing Kali Linux.
Here is a guide to getting started with Kali Linux. First of all, there are two ways to install and use Kali Linux, a complete installation, or in some Virtual Box like VMwareor Virtual box. You can download VMware or Virtual Box by clicking on their respective names. I personally prefer Virtual Box because it has almost all the features of VMware and is a freeware (OMFG ITS FREE!). And download Kali from here.
There is only difference of a few steps; that will be added for Virtual Machine users. So, I’m just going to demonstrate for Virtual Box users.
Now a very important step, you have to enable visualization from your BIOS. This is different for all motherboards, so Google how to do it for your specific motherboard. Then just follow the screenshots below.
Now that you have Virtual Box and Kali Linux, it’s time to get things going. Open Virtual Box, it’ll look something like this, without the Virtual Machines at the left.
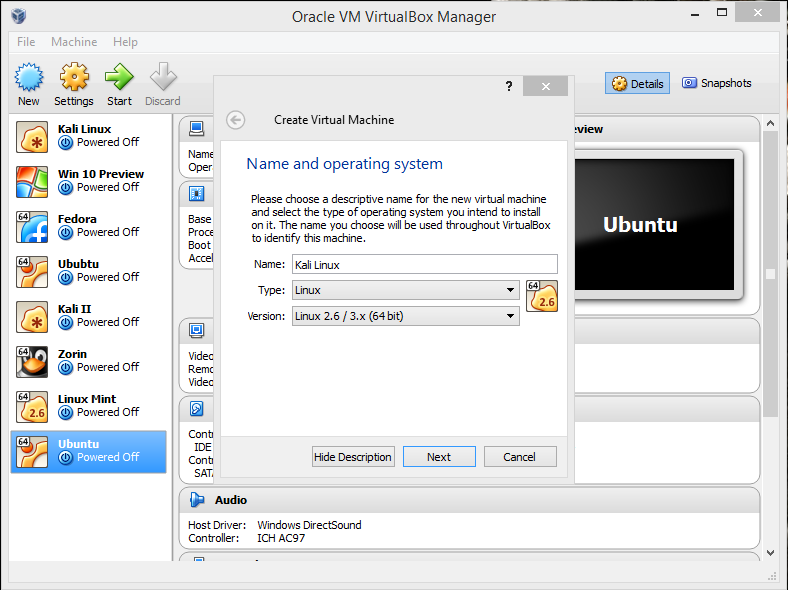
For creating a VM, click on “New“,
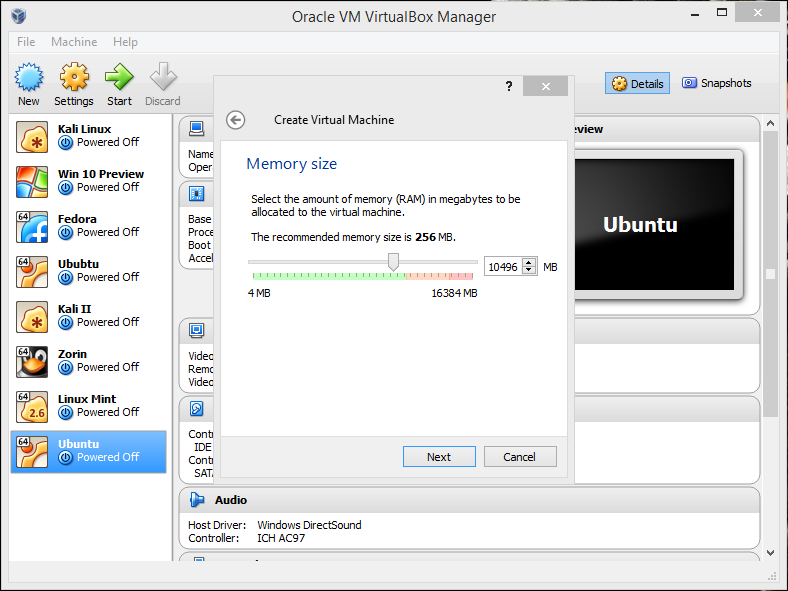
Name it whatever you want to, then click “Next“. You will be prompted to select the amount of RAM you want to reserve for your VM.
Now, it’ll ask for hard drive space allocation, just leave at the default option, “Next“!
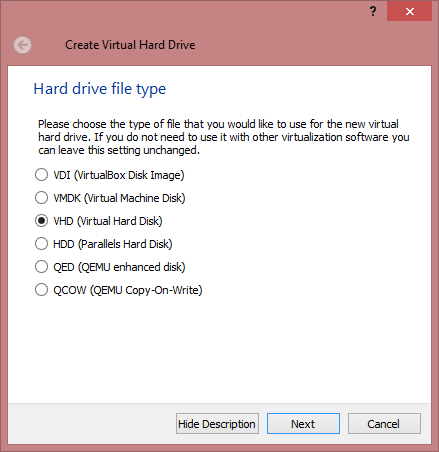
Here, select “VHD“, “Next“,
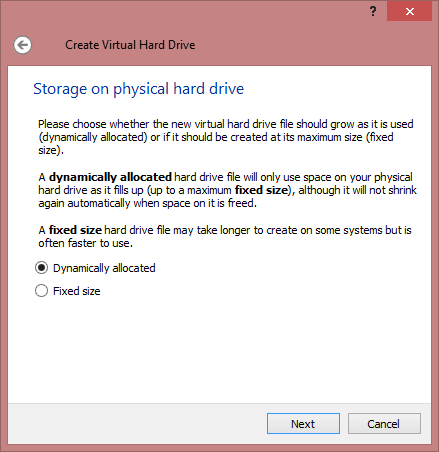
Select “Dynamically Allocated“,
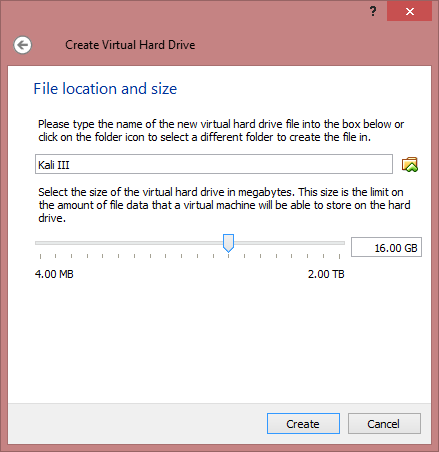
Here, select the desired size of the Virtual Hard disk,
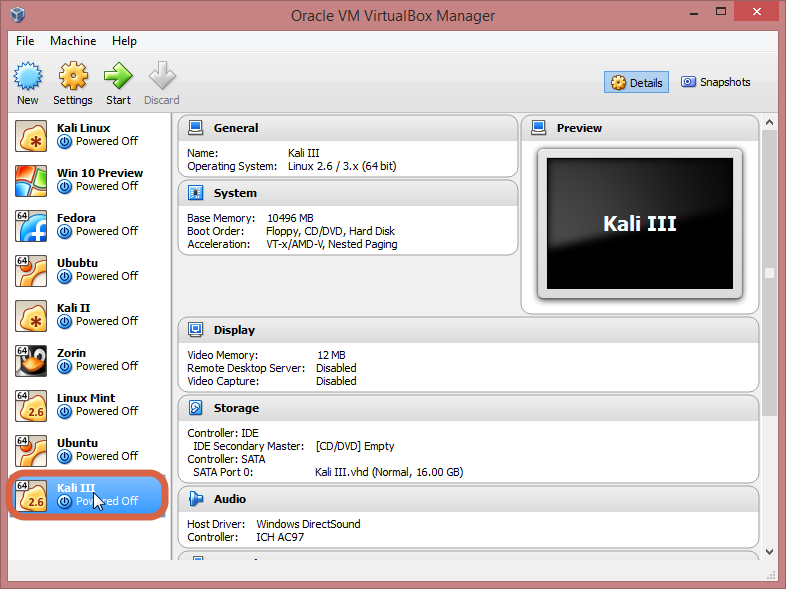
You have successfully created a VM. Bye!
Just kidding…. there’s still a lot.
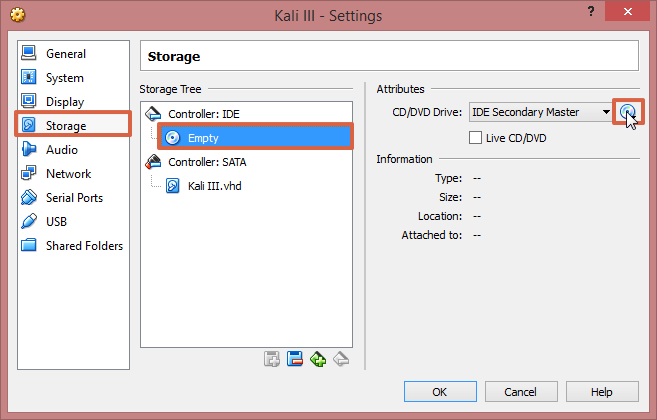
Now, click on settings > storage > click on the cd image at the right hand corner, as shown. Now browse to your downloaded image. Click OK.
It’s finally complete. Click start.
For normal (non-VM) users follow along from here. I will be explaining all the ways you can install and use Kali.
First one is “Live” this option does not save any changes to your Kali account… it’s like uninstalling Kali every time you shut down.
Then, there’s persistence, this one is exactly opposite to the former, this saves all your settings and data.
Now for the most important one for non VM users (at least I think so :3). A prefatory note – please make a bootable flash drive (more than 8gigs is recommended) with the Kali Linux .iso that you download; persistence and encrypted persistence will only work on flash drives.
For persistence, there are many ways to do this, I’m going to describe the Linux method.
Type “gparted /dev/sdb”, you will find “/dev/sdb1 /dev/sdb2” and “unallocated area” right click within the unallocated section, then select new from the drop-down menu that appears. Create a Primary Partition, choose “ext 4” as the file system, and label the partition with the word: “persistence “. Click on “Add” then “Apply” and let the computer format the partition in “ext 4” with the label persistence. When the process is completed open up a terminal window and enter the following:
“mkdir -p /mnt/my_usb”
“mount /dev/sdb3 /mnt/my_usb”
“echo “/ union” > /mnt/my_usb/persistence.conf”
“umount /dev/sdb3”
Reboot and start the machine with Kali and select “Live USB Persistence”.
For encrypted persistence, it’s a very long process… so… will do that in a later post.
Now the last one, install… it’s just as it sounds, it permanently installs Kali Linux… this is for people who wish to use Kali as their daily driver.
Now, that you have booted into kali, here are some useful things you could do starting up and some fixes for some common problems.
First, let’s update & upgrade our installation,
Type “apt-get clean && apt-get update && apt-get upgrade –y”.
Another major problem I’ve noticed is the sound is always muted, to fix this, open a terminal window, type “apt-get install alsa-utils –y”, then right click on the small volume icon on the top right corner and select Sound Preferences, Change the Output volume slider to ON. Done!
Now, go do your own thing in Kali, explore, hack, test, crack hashes and burn the sh*t out of your CPU!! while I go be a genius billionaire playboy philanthropist. (yes I’m part time Iron Man) (Jarvis runs on UNIX, don’t you?… He says yes in a very rhetorical fashion).

Why server side games generally can’t be hacked

Why server side games generally can’t be hacked

We get many question daily asking us how to hack games such as Clash of Clans this article explains why server side games generally can’t be hacked
Overview –
• The Server – This party is responsible for serving content.
• The Client – This party requests content from the Server, and displays them to the user. In most cases, the client is a web browser.
Each side’s programming, refers to code which runs at the specific machine, the server’s or the client’s.
Server Side Code –
Server side is the code that resides at web server.
For every client request code is executed at server side and result is send to the client in simple HTML format.
Performance is lower than client side code due to server round trips.
Client cannot see the business logic though it is stored on server.
Client Side Code –
Client side code is reside at client’s browser itself. It is executed at
client side only. User can easily see the code by View – > Source option.
It is generally used in validation form like text field is empty or not, email address validation etc. It is faster than server side code
Server side code is responsible to execute and provide
the executed code to the browser at the client side. The executed code only have the
values or the results that are executed on the server.
There are many programs out there that claim to be able to hack games such as Clash of Clans, these are all fake, here’s why:
Any so called ‘gem hack’ will not work because the data is stored server side, so editing the data client side will then need to be confirmed server side.
In other words, there is no way to hack such a game. If there were a way, somebody would have figured it out, spread the information, and then it would have to have been patched rapidly. These kinds of games are specifically designed for people to not be able to hack into them. In order to do so you would have to gain access to the server and alter the information that contains things like how many gems you have. This in itself is a near impossible task because this information is sensitive and secure. It’s like if you were trying to gain credit card information off of a website like Amazon. It’s extremely unlikely and illegal that you’ll find a crack, but leaks do occur from time to time.

Top 10 Screen Recording Software For Windows

Screen recording software can be useful when you want to show a project or some informational video on Howto or a presentation or even record a game to share yourgame play with your friends and family.
We have listed few best screen recording software. Links will open in new tab.

1.CamStudio (Free)

CamStudio is used widely for recording screen and capturing. You can even enable or disable your mouse cursorrecord sounds from software or a microphone. You can even select your screen pixel to be recorded or a selected program window so that the rest won’t be recorded in your desktop.

2.Ezvid (Free)

Ezvid is a screen recording software with an in-built video editor where you can split your recordings and you can add text and slip your recordings and create a slideshow effect and speed control. Using this software you can upload your video directly to YouTube.
3. Jing (Free)
Jing allows you to capture video, animation and images and share them on internet. In jing we can create short keys to make things quicker. You can record and selectedWindow or region that you would like to record in Jing

4.Screenr (Free)

Unlike other software screenr has nothing to do with you computer or install on your computer. It is a free online tool where you can record your screen without installing any software on online. It requires Java and you can record upto 5mins maximum.

5. Rylstim Screen Recorder (Free)

Rylstim Screen Recorder is simple software that just records your screen after you hit “Start Record” This software does’nt record input device like microphone. Rylstime is a free software and you can even get a paid version too. This software is useful for people who are lazy on configuring their settings.

6.Camtasia Studio (Paid) (Free Trial Version only)

Camtasia studio best paid software for screen recording or screen capturing. You can even import videos, music, photos and customize according to your need. You can even export your video or upload your video directly to YouTube.

7. Webinaria (Free & Open Source)

Webinaria is a open source software for screen recording and screen capturing. Using this software you can create Flash(AVI to FLV) recordings of your desktop, record microphone with your presentation or demo and even save or edit your recordings to add voice, webcam or text.

8.FRAPS (Paid) (Free Trial Version Only)

FRAPS is widely used by gamer’s to record game play. Fraps can capture audio and video upto 7680×4800 with custom frame rates from 1 to 120 fps (Frames per second). In Fraps we have hotkeys to record screen. It also used for recording movies at great quality.

 9.ActivePresenter (Free + Paid)

Active Presenter is similar to other screen recording softwares. You  can add voice, call-outs, annotations, videos and graphics. You can export your video to website,desktop,mobile device.

10.Icecream Screen Recorder (Free)

Icecream screen recorder a free tool to record your screen as a screenshot or a video. Easy to use and can record Skype video in HD and record webinars and games. In 3 ways to explain this is easy,simple and useful tool.